Real-Time Automation
In this hands-on tutorial we will be building a simple automated triage application that uses Re:infer to categorise incoming emails in real time. We'll build an end-to-end workflow that can be used as a starting point for your own Re:infer automation, and take a detailed look at how to use the real-time Stream API.
Prerequisites
Re:infer Basics
Before starting this tutorial, please make sure you are familiar with Re:infer concepts and terminology and Re:infer API basics.
Re:infer Access
You need the following permissions in order to follow the tutorial. You can check your current permissions on your Manage Account page.
| project | description | permissions |
|---|---|---|
reinfer-sandbox | Contains the pre-labelled reinfer-sandbox/integration-tutorial dataset used in this tutorial. | |
| Your development project | During your onboarding, you should have received access to a project that you can use as your development environment. |
Please
contact support
if you are unsure what project you can use for development, or if you require
"View sources" and "View labels" permissions in reinfer-sandbox.
Tutorial Data
In this tutorial, we will be using pre-labelled data. In order to make a copy of
the pre-labelled reinfer-sandbox/integration-tutorial dataset, create a new
dataset in your development project using the "Copy an existing taxonomy"
option. You can find instructions on how to do that
here.
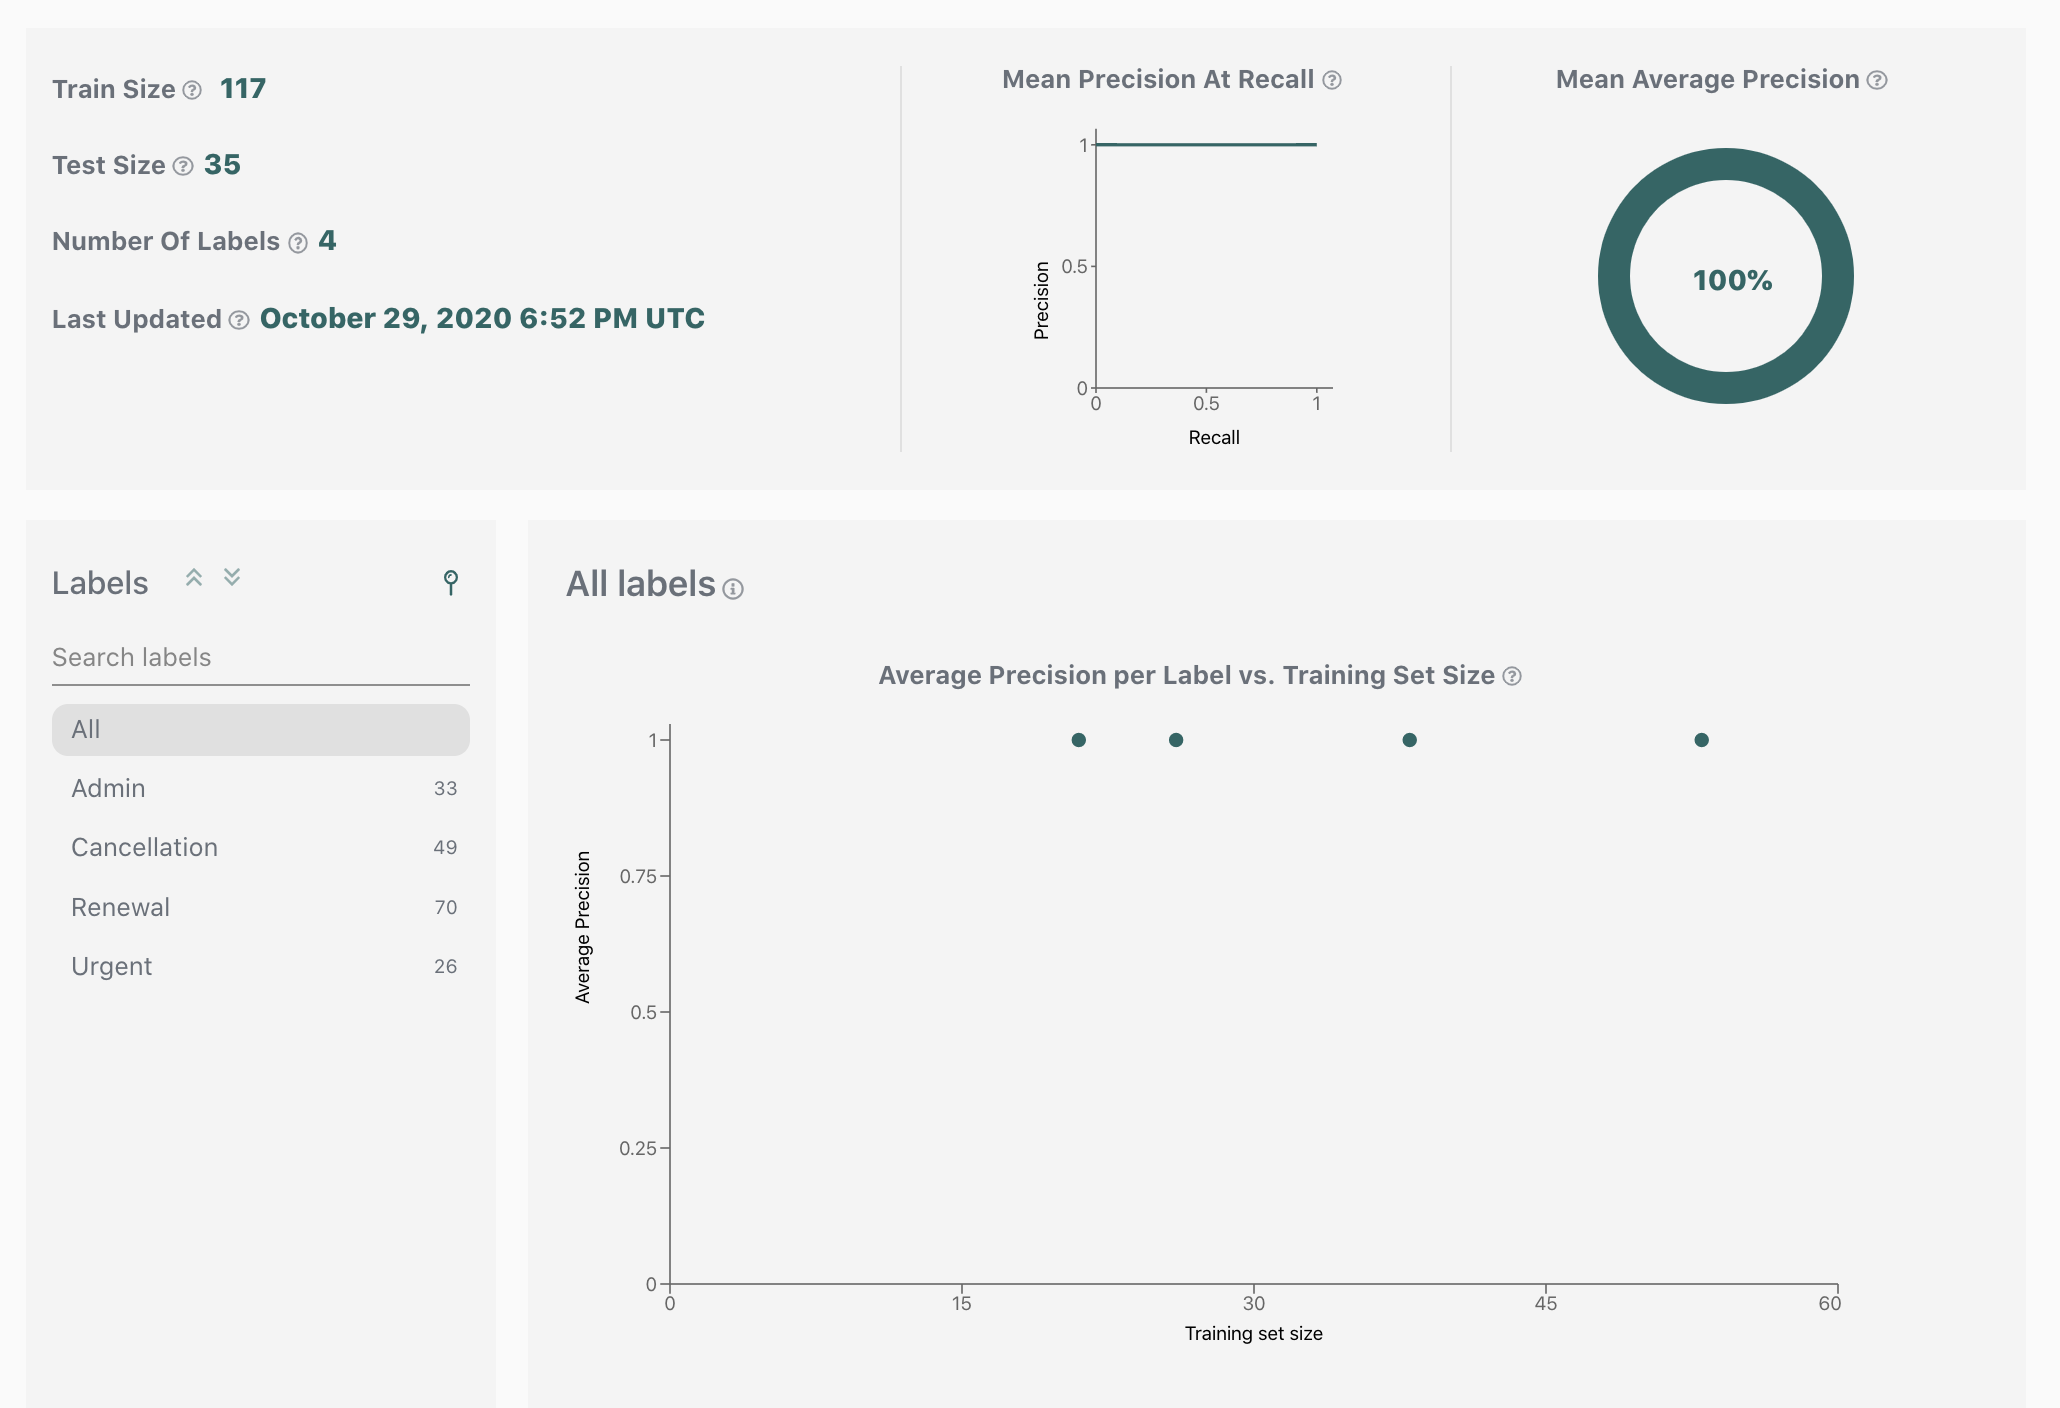
Since your new dataset contains labelled data, the model will start training immediately. You can track the model training status in the dataset status bar. Once done, performance metrics for each label will appear on the Validation page, and a new model version will appear on the Models page.

Design your application
Now that you are familiar with the prerequisites, let's start building our end-to-end workflow. In this section we will discuss the design of a simple automated triage application and its integration with Re:infer. In the next sections we will learn about the Stream API that will drive our automation. Finally, we will build our application based on the design here, and test it using pre-labelled data.
Use-Case Overview
We will target a typical email support use-case as the starting point for our design:
- An Outlook support mailbox receives a large number of customer emails daily.
- A triage team turns each email into a support ticket. This requires populating ticket fields with information from the email (eg. a customer ID). Each ticket is then added to the appropriate workflow queue.
- The tickets in the workflow queues are continuously processed by a customer support team.
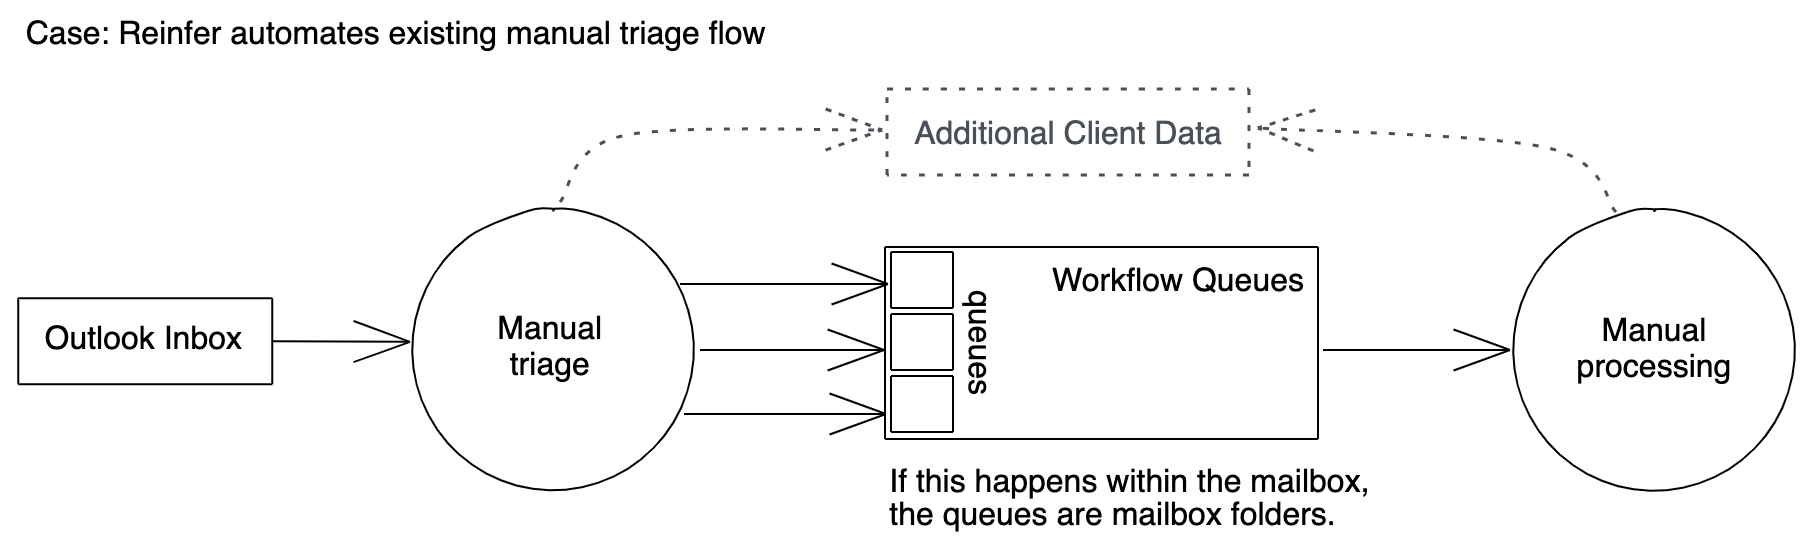
There are two automation opportunities here: the triage step and the processing step. This tutorial will demonstrate how to automate the triage step by using Re:infer to extract required fields from the email, and assign the email to a workflow queue.
While the processing step is not discussed in this tutorial, it relies on the data collected during the triage step, so you have the option of adding it after building the sample triage application.
End-to-End Design
Let's take a look at the diagram below, which sketches out the end-to-end design we will build:
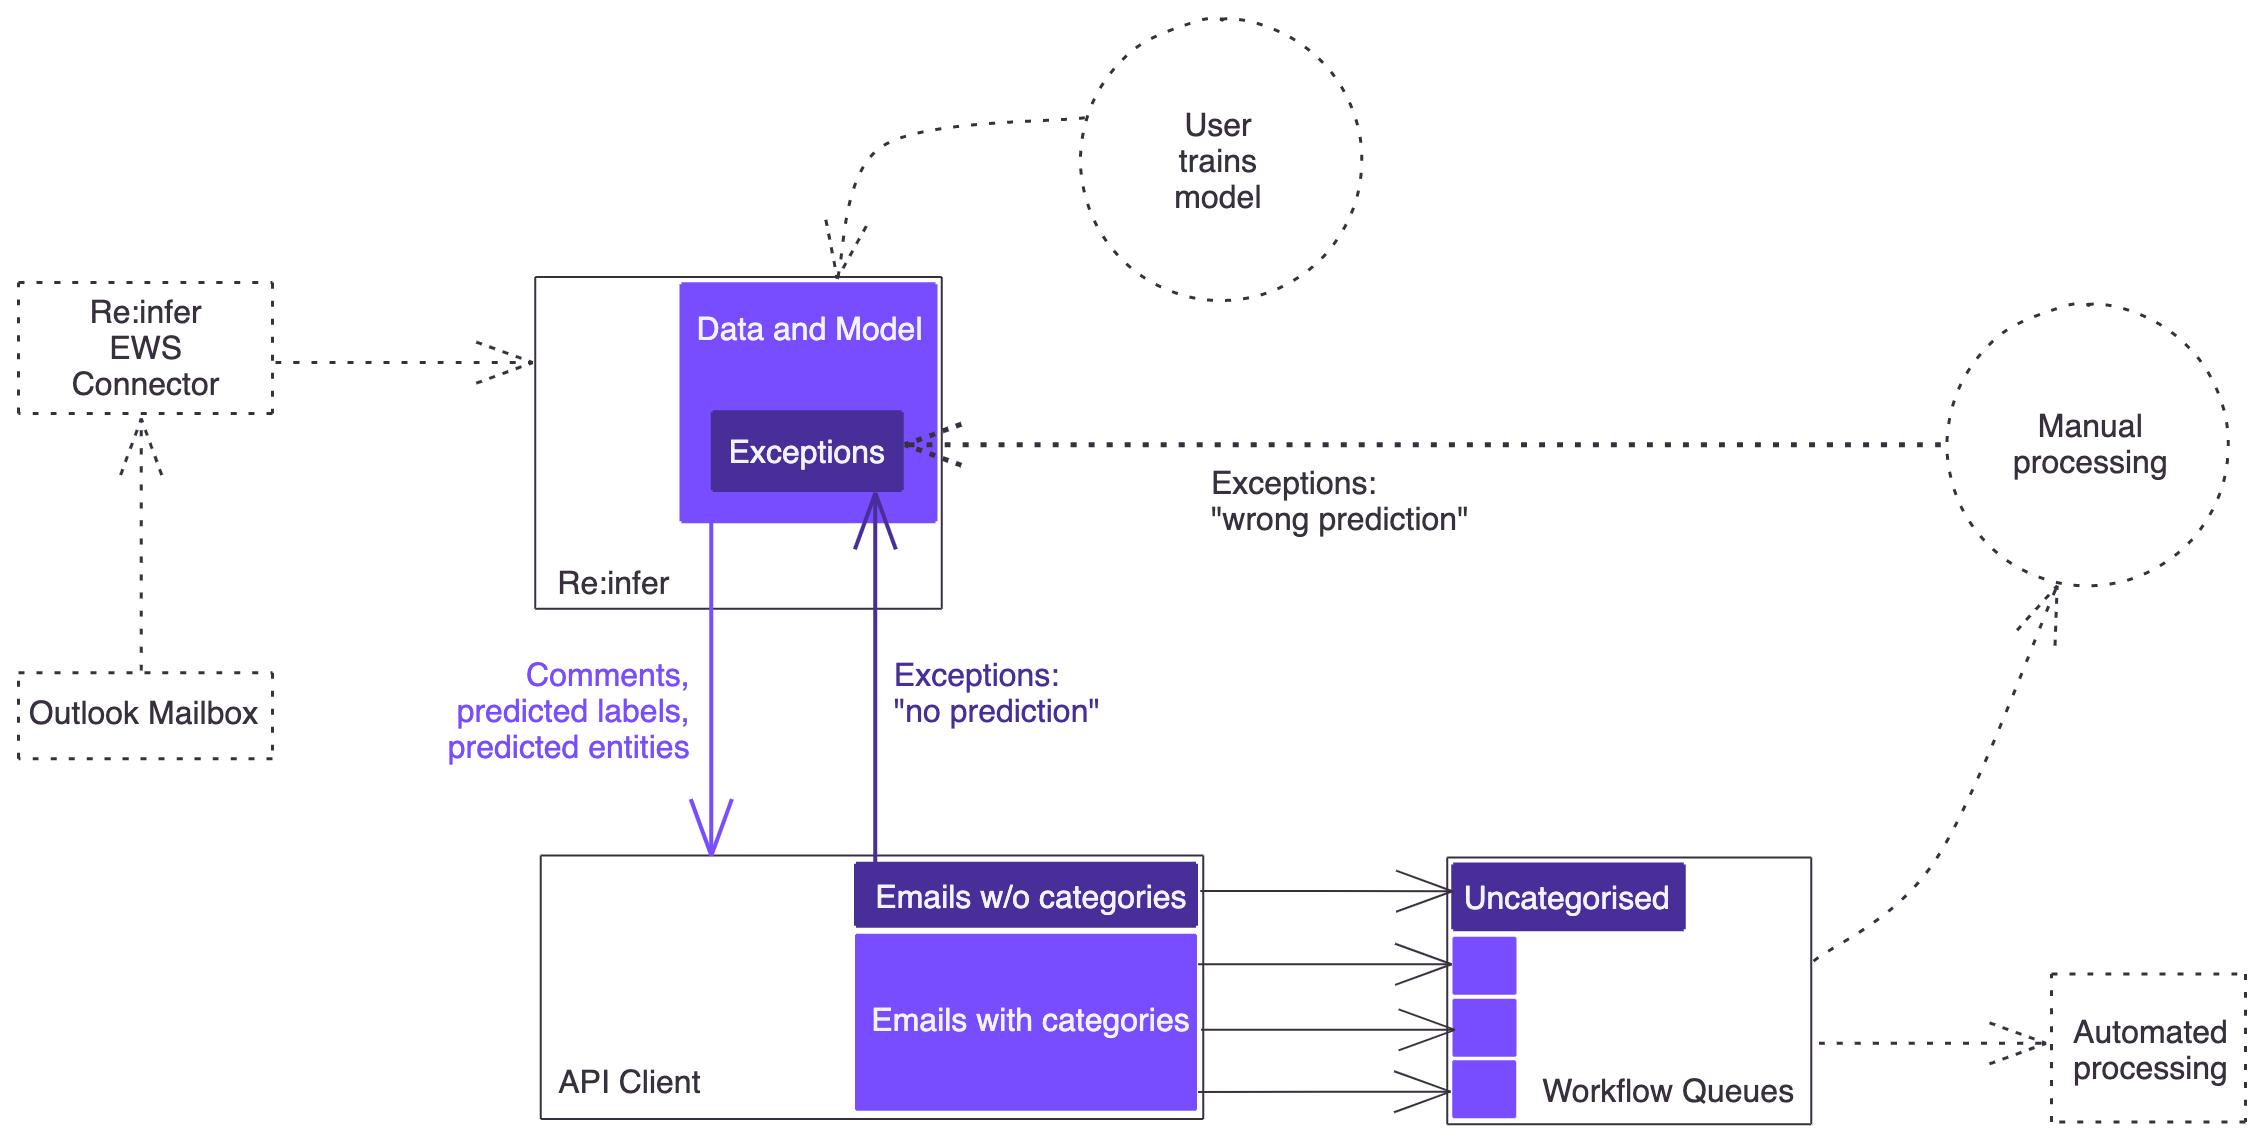
Due to the live connection between the Exchange server and Re:infer, Re:infer can serve as a data source for your application. This way a separate connection between your application and the Exchange server is not needed. Your application will continuously poll Re:infer for new emails, and receive them together with their predicted labels and entities. (We assume that no users are working directly in the mailbox's inbox at the same time as your application is running; otherwise you would need to account for conflicts between your application and mailbox users).
Your application will query Re:infer and, for each email, check whether the required labels and entities are present in the API response. If yes, it will create a ticket in the appropriate workflow queue. If not, it will make a second API request to Re:infer to mark the email as a "no prediction" exception. Similarly, there should be a way for users processing the tickets to report miscategorised tickets so that the corresponding emails can be marked in Re:infer as a "wrong prediction" exception. (Both exception types will then be reviewed and labelled by the model maintainer in order to improve model performance).
Parts of the design (shown in the diagram with a dotted outline) will be out of scope for this tutorial. In a real-life scenario, these steps should of course not be skipped:
- We will be using existing data in the platform instead of setting up a live EWS connection.
- The data comes pre-labelled, so we won't need to train a model.
- We won't design a feedback loop for "wrong prediction" exceptions since the design depends on the capabilities of the system where tickets are processed.
Data Ingestion
The recommended option for getting email data into Re:infer is to use the Re:infer EWS connector, but other options are also available. Since we are using data that is already in the platform, setting up data ingestion is not part of this tutorial. You can learn more about all available data ingestion options here.
Business Logic
We would like to automate this process:
A triage team turns each email into a support ticket. This requires populating ticket fields with information from the email (eg. a customer ID). Each ticket is then added to the appropriate workflow queue.
For the sake of this tutorial, let's assume that our workflow queues are "Renewal", "Cancellation", "Admin", and "Urgent". Emails concerning renewal, cancellation, and admin tasks (eg. address changes) are supposed to go into the respective queues, while all urgent emails should go into the "Urgent" queue regardless of topic.
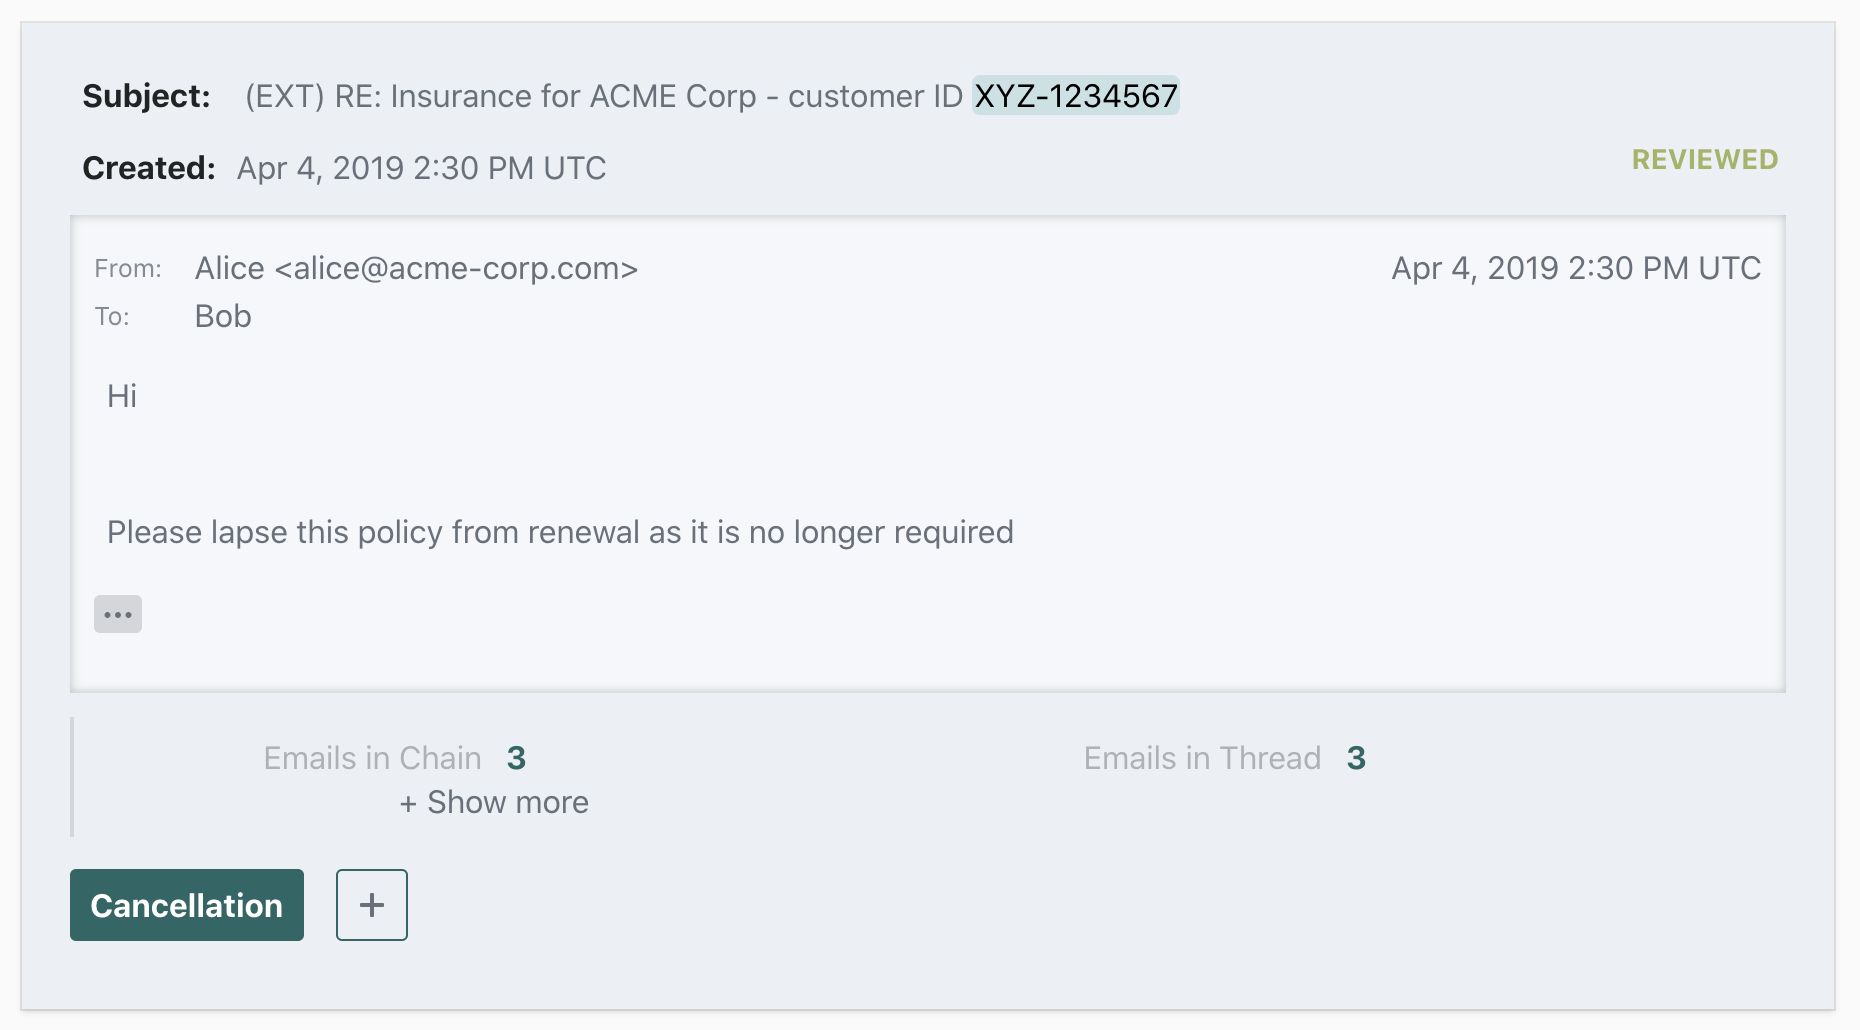
Let's also assume that each email can contain a customer ID (either in the subject or the body of the email). The customer ID needs to be extracted so that it can be used when creating a ticket from the email. But since customers sometimes forget to include the customer ID, we want to make this field optional so that a ticket can be created even if no customer ID is present.
In order to be able to categorise emails into the four workflow queues, the model has been trained to predict the labels "Renewal", "Cancellation", "Admin", and "Urgent". In order to extract the customer ID, a "Customer ID" entity has been configured. (Re:infer comes with many pre-built entity kinds; further entity kinds can be added based on the needs of your specific integration. You can see a list of currently available entities here, and learn about requesting new entity kinds here).
We can now come up with a mapping between the predicted label(s) received from Re:infer and the workflow queue the email should go into:
IF number of labels == 0 THEN put email into "Uncategorised" queue
IF one of labels is "Urgent" THEN put email into "Urgent" queue
ELSE
    IF number of labels == 1 THEN put email into the respective queue
    ELSE put email into "Uncategorised" queue
We made a few choices for the sake of the tutorial:
- In addition to the existing four workflow queues there is a special "Uncategorised" queue. If the model is not able to provide a prediction, we put the email there to be manually processed. Alternatively we could have picked an existing queue that should deal with all uncategorised emails, for example "Admin".
- If an email has more than one label from the set of
["Renewal", "Cancellation", "Admin"], it means that it contains multiple requests. We choose to put such emails into the "Uncategorised" queue, perhaps because we don't anticipate to get many of them. Alternatively we could have created a "Complex Requests" queue.
In a real-life scenario, you should base such decisions on the specific requirements of your use case.
Model Training
In order to query a model for predictions you of course need to have a trained model. A model is trained by labelling some of the data you ingested. Since multiple hours of labelling are required in order to produce a model that performs well, we will be using pre-labelled data in this tutorial so that you won't need to train your own model.
In a real-life scenario, a model trainer should have good domain knowledge of the data. For example, the user of a support mailbox would be a good model trainer to label the data coming from that mailbox. The training needs to be done carefully in order to produce a model that performs well and is not biased. To that end, Re:infer provides training resources and offers hands-on training workshops.
Exception Handling
Even a well-performing model will occasionally provide incorrect results, either by failing to predict a label, or by predicting the wrong label. One of the best ways to improve the model is to label the emails the model doesn't perform well on. For this reason, we want to have a feedback loop for such emails:
For each email, your application checks whether required labels and entities are present. If yes, it creates a ticket in the appropriate workflow queue. If not, it makes a second API request to Re:infer to mark the email as a "no prediction" exception. Similarly, there should be a way for users processing the tickets to report miscategorised tickets so that the corresponding emails can be marked in Re:infer as a "wrong prediction" exception.
Our design shows feedback loops for both types of exceptions.
Downstream Systems
Our design shows workflow queues in an abstract way. In reality, you might be pushing the emails directly into a CRM platform, use a message broker such as Kafka, or even simply move the emails from the inbox folder into a subfolder. For the purposes of this tutorial, we will mock up the queues, but you are encouraged to develop your test integration end-to-end.
Understand Stream API
In order to fetch incoming emails together with predicted labels and extracted entities, we will use the Stream API. The Stream API allows you to define a stream of comments based on a dataset, pinned model version, and optional comment filters, and to iterate through them in a stateful way.
Each result in the Stream response will contain a comment, a list of predicted labels, and a list of entities. This is passed as a JSON structure as seen below:
{
    "comment": {...},
    "entities": [...],
    "labels": [...],
    ...
}
The following section explains how to correctly interpret the predicted labels in each stream response.
Confidence Thresholds
Confidence Scores
The Stream endpoint will return predicted labels together with a confidence score (a number between 0 and 1). For example, the snippet below would be for predictions of "Cancellation" and "Admin" with confidences of about 0.84 and 0.02 respectively:
"labels": [
    {
        "name": ["Cancellation"],
        "probability": 0.8374786376953125
    },
    {
        "name": ["Admin"],
        "probability": 0.0164003014564514
    }
]
In order to correctly interpret such a result, you need to determine the minimum confidence score at which you will treat the prediction as saying "yes, the label applies". We call this number the confidence score threshold.
Precision and Recall
In order to understand confidence thresholds you should be familiar with the terms precision and recall. You can find an explanation of these terms on our support pages. Briefly, a high precision relates to a low false positive rate (i.e. your results are more likely to be accurate), and a high recall relates to a low false negative rate (i.e. you are less likely to miss relevant results).
Confidence Threshold
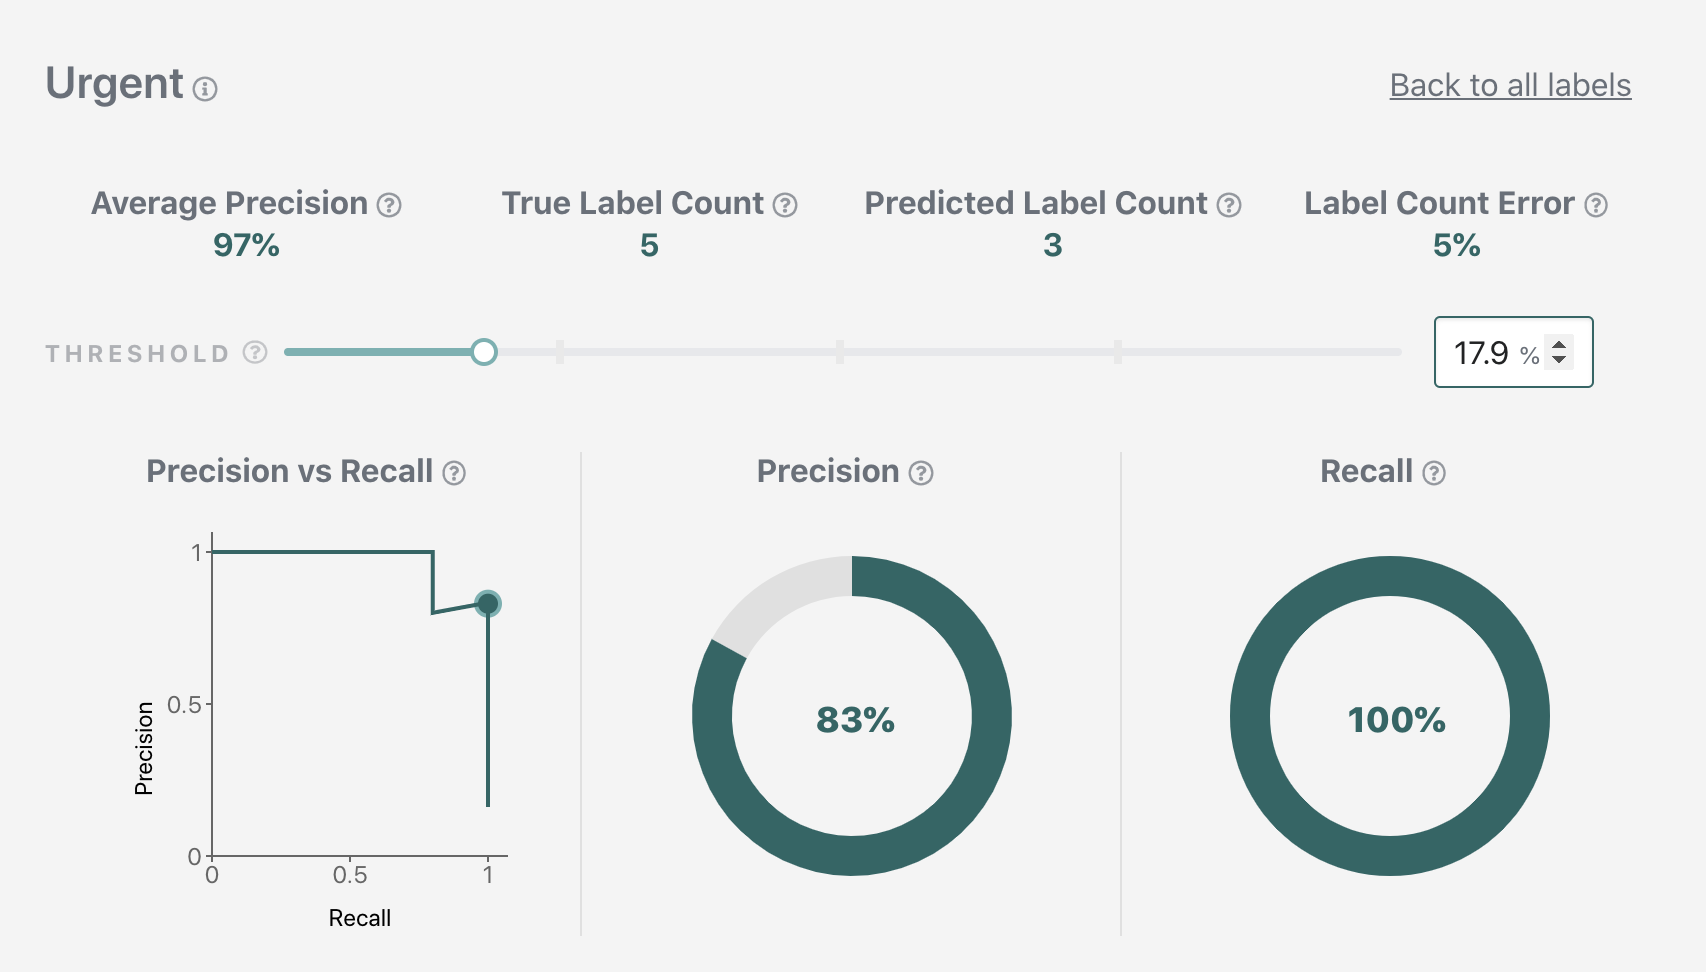
The confidence threshold for a label corresponds to a specific precision-vs-recall tradeoff. Unless your model performs perfectly, having high precision will sacrifice some recall, and conversely having high recall will sacrifice some precision. These tradeoffs are visualised as a precision-recall-curve for each label on the Validation page.
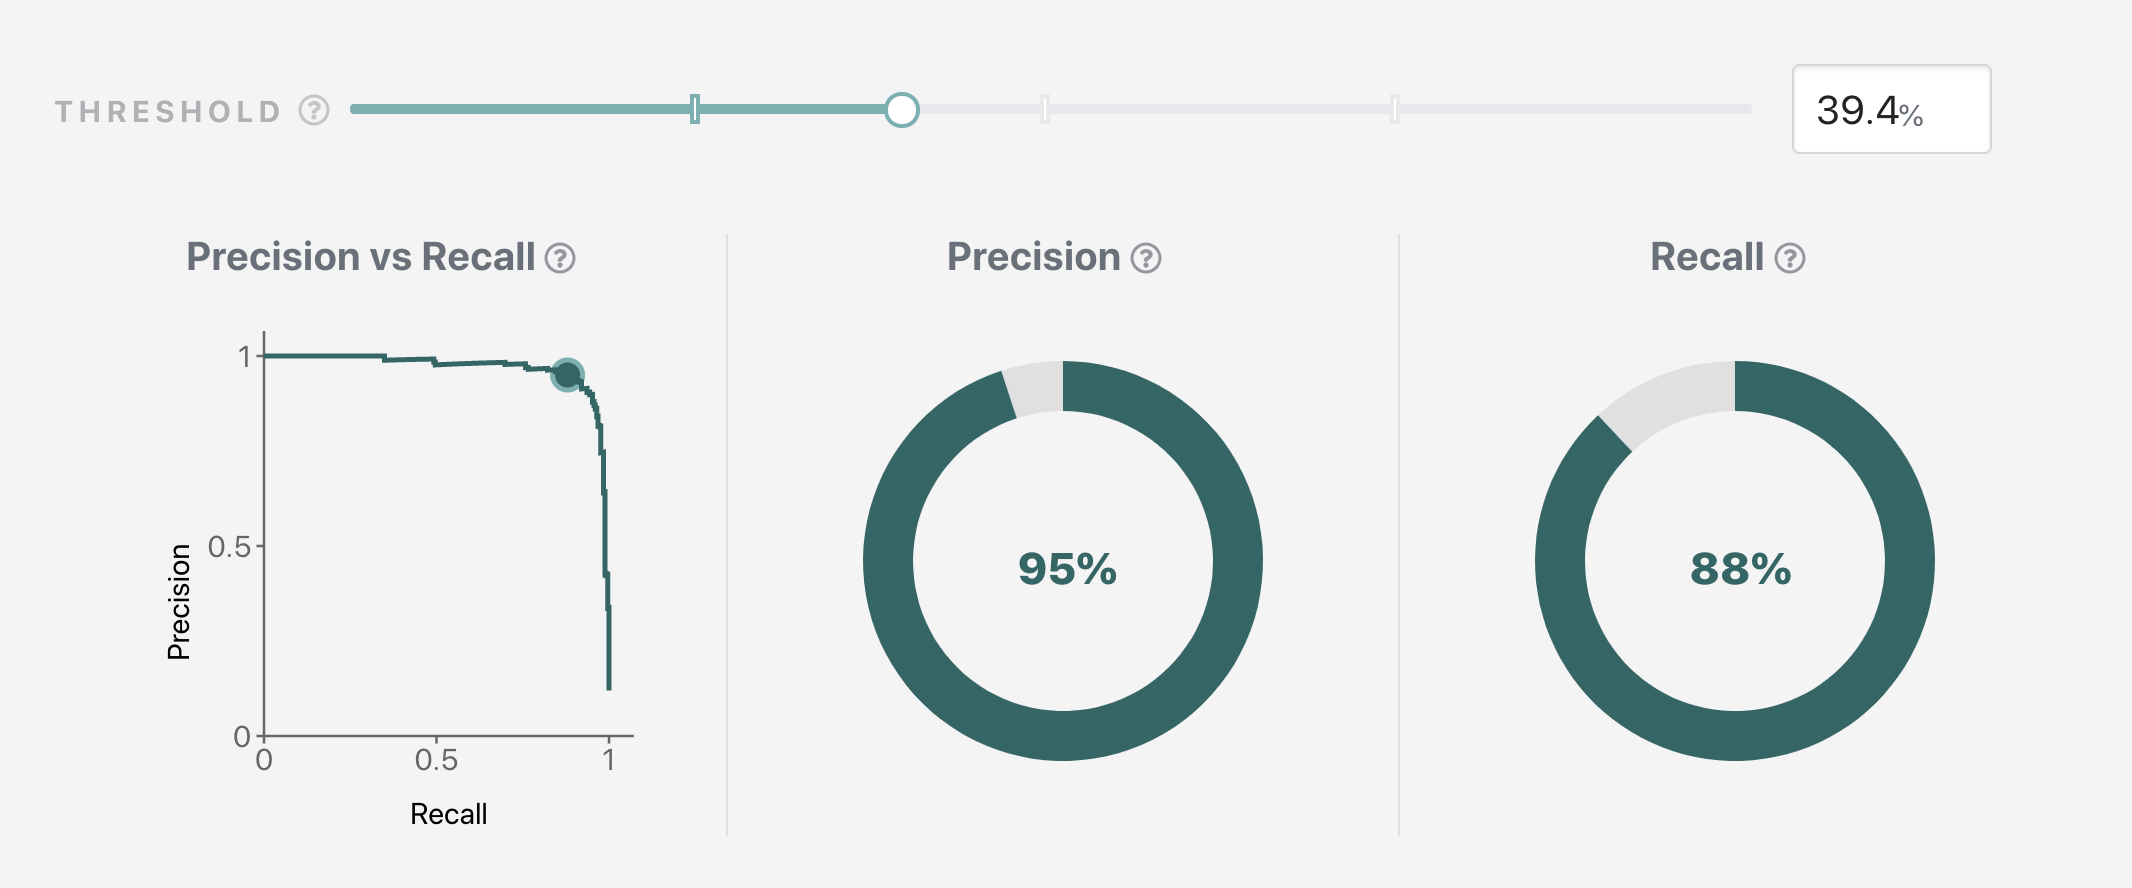
Using the interactive slider, you can quickly find your desired threshold: move the slider to the right to optimize for precision, or to the left to optimize for recall, until you find the precision and recall that matches your application requirements. The displayed threshold value will be your desired threshold. If you want to learn more about the Validation page functionality, please see the support pages.
If you look through the Validation page you might notice that the shapes of precision-recall-curves are different for each label. This gives you a hint as to how we will be picking thresholds: we will pick an individual threshold for each label. This is particularly important in automation applications where the best performance must be ensured.
Example Thresholds
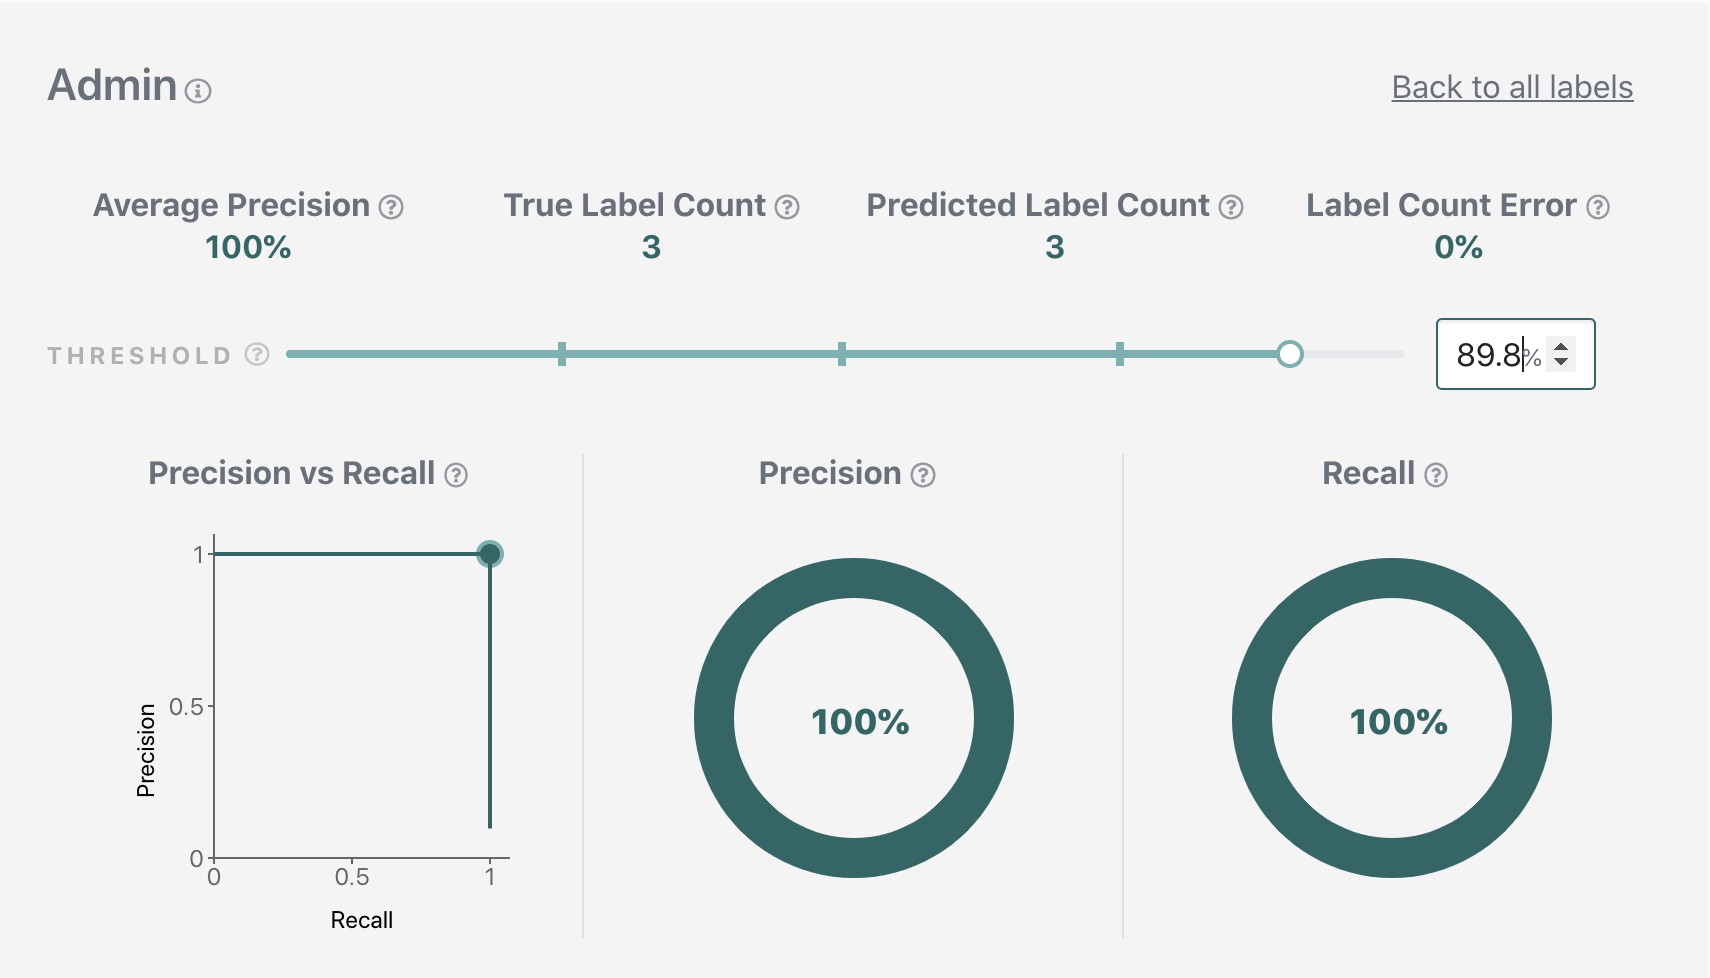
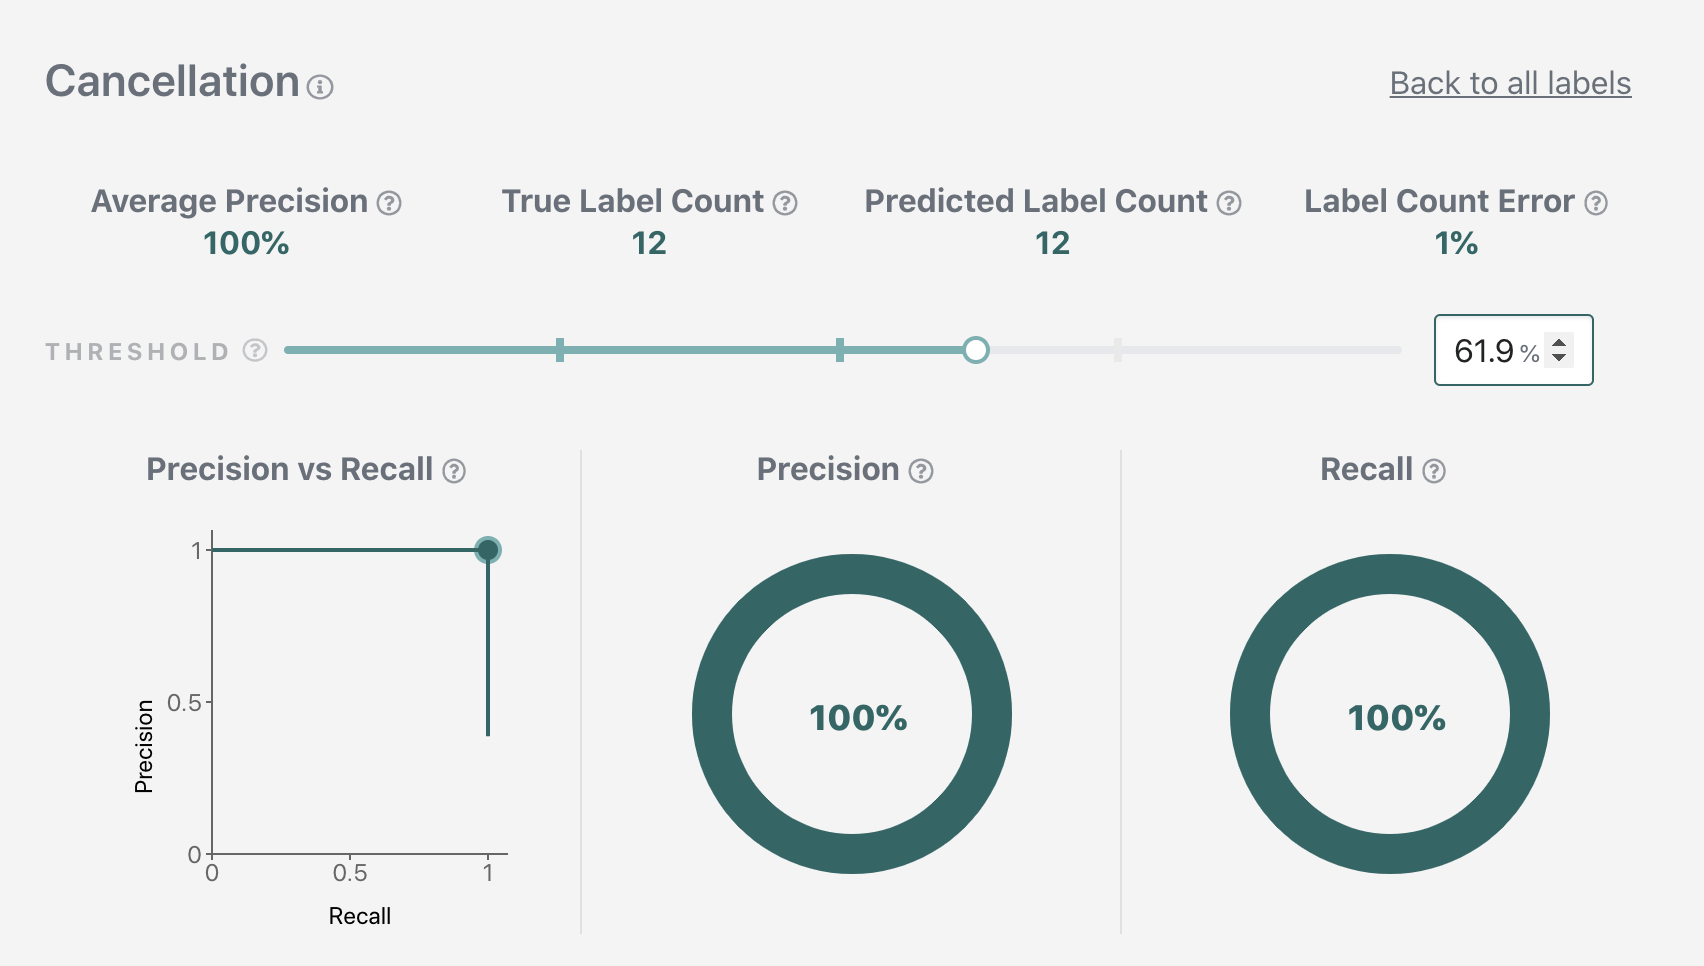
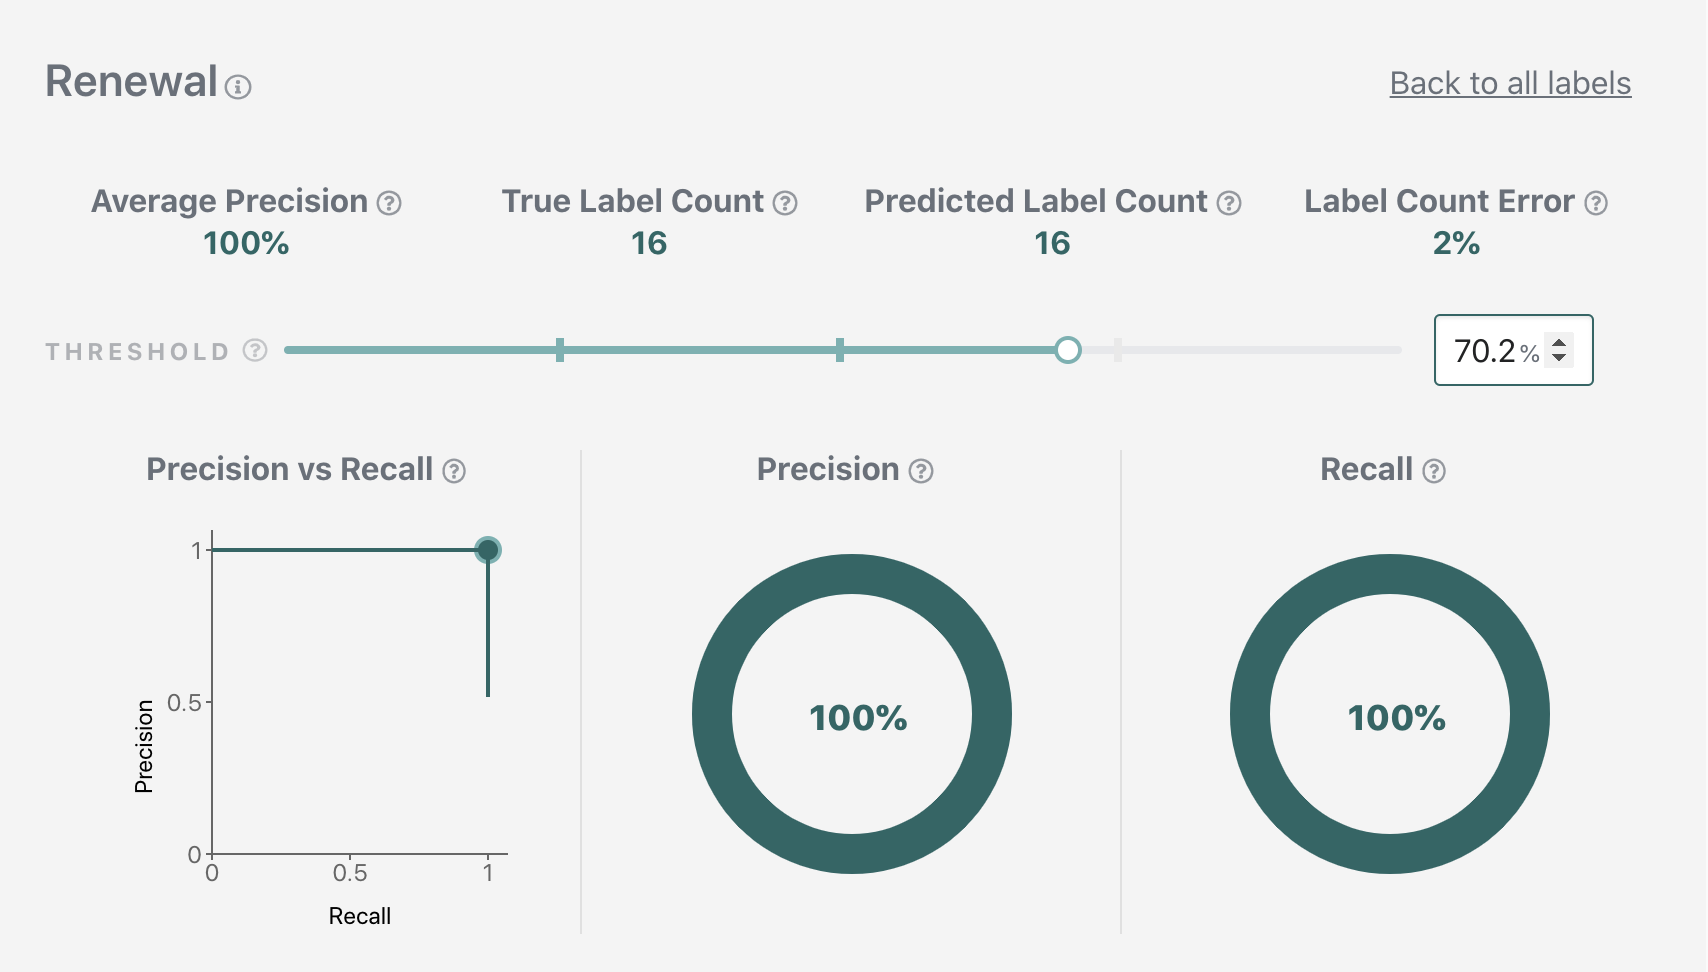
For our sample application, we will pick a balanced precision-vs-recall tradeoff for our "Renewal", "Cancellation", and "Admin" labels, and optimize for recall for the "Urgent" label (so that we are less likely to miss urgent emails). (Note that due to continuous improvements in the underlying ML performance, by the time you are doing this tutorial the precision and recall values at the picked threshold might be slightly different from what is shown here.)
We'll be using the following threshold values for the rest of the tutorial.
Admin: 0.898 (corresponds to 100% precision at 100% recall)
Cancellation: 0.619 (corresponds to 100% precision at 100% recall)
Renewal: 0.702 (corresponds to 100% precision at 100% recall)
Urgent: 0.179 (corresponds to 83% precision at 100% recall)
We can now apply the thresholds to our example. The "Cancellation" label applies
since 0.8374786376953125 > 0.619. The "Admin" label doesn't apply since
0.0164003014564514 < 0.898.
"labels": [
    {
        "name": ["Cancellation"],
        "probability": 0.8374786376953125
    },
    {
        "name": ["Admin"],
        "probability": 0.0164003014564514
    }
]
To make this process easier, the Streams API allows you to specify your label thresholds in the Stream config. If specified, only labels with values above its threshold are returned.
In a real-life scenario, the target precision-recall performance will be decided by the combination of business requirements and historical model performance. For example, if a label historically achieved 85% precision at 55% recall, you may decide to invest additional time into training it up to 90% precision at 55% recall. You will then pin the new model version, pick new thresholds, and update the configuration of your application.
Build your application
Having finalised our design, we are ready to start building out our application.
Pin your Model
Go to the Models page and pin the model by clicking on the "Save" toggle. Once the model is pinned, you can start accessing it via the API.
If you want to follow this part of the tutorial using a different labelled dataset, you should make sure that it's sufficiently labelled. In particular, a dataset with only a few labelled examples will produce a model that won't return predictions for the majority of comments.
Stream Configuration
In most cases, it is enough to specify the Stream name, dataset name and model version, and the labels you are interested in. For a full list of options, see the Stream API reference.
For each label, you should specify a threshold. See the section earlier in this tutorial on how to pick label thresholds.
curl -X PUT 'https://<my_api_endpoint>/api/v1/datasets/<my-project>/<my-dataset>/streams' \
    -H "Authorization: Bearer $REINFER_TOKEN" \
    -H "Content-Type: application/json" \
    -d '{
      "stream": {
        "name": "<my-stream-name>",
        "model": {
          "version": <my-model-version>,
          "label_thresholds": [
            {
              "name": [
                "Parent Label",
                "Child Label"
              ],
              "threshold": <my-label-threshold>
            },
            {
              "name": [
                "Label Without Parent"
              ],
              "threshold": <my-label-threshold>
            }
          ]
        }
      }
    }'
Fetch-and-Advance Loop
You can now use your stream to fetch comments from Re:infer. Note that very low batch sizes (such as fetching in batches of 1 comment) will impact the speed at which the comments are fetched.
curl -X POST 'https://<my_api_endpoint>/api/v1/datasets/<my-project>/<my-dataset>/streams/<my-stream-name>/fetch' \
    -H "Authorization: Bearer $REINFER_TOKEN" \
    -H "Content-Type: application/json" \
    -d '{
      "size": <my-stream-batch-size>
    }'
The initial position of the stream is set to its creation time. For development purposes, it is often useful to fetch comments that were created before the stream. In order to do so, you can set the stream to a specific timestamp.
curl -X POST 'https://<my_api_endpoint>/api/v1/datasets/<my-project>/<my-dataset>/streams/<my-stream-name>/reset' \
    -H "Authorization: Bearer $REINFER_TOKEN" \
    -H "Content-Type: application/json" \
    -d '{
      "to_comment_created_at": "<YYYY-MM-DDTHH:MM:SS>"
    }'
If you rerun the fetch request now, it will fetch starting from the same
position. In order to fetch the next batch of comments, you have to acknowledge
the previous batch with an advance request. In the advance request, you have
to provide a sequence_id which you can find in your fetch response.
The fetch-and-advance loop guarantees that you don't accidentally skip comments if your application fails during processing. Note that your application needs to be able to handle seeing a comment multiple times in case of successfully processing a comment but failing at the advance step.
curl -X POST 'https://<my_api_endpoint>/api/v1/datasets/<my-project>/<my-dataset>/streams/<my-stream-name>/advance' \
    -H "Authorization: Bearer $REINFER_TOKEN" \
    -H "Content-Type: application/json" \
    -d '{
      "sequence_id": "<my-sequence-id>"
    }'
Note that you have to provide the dataset name in all API requests using the stream - this is because streams are scoped under datasets.
Process Results
The response will contain comments, and predicted labels and entities, as described on the Comments and Labels and Entities pages. Please refer to these pages to understand how to parse the response.
Exception Handling
If you application allows users to tag items that were predicted incorrectly, you can use the exception endpoint to tag the corresponding comment as an exception in the platform. The exception name will be available as a filter in the dataset, so that a model trainer can review and label exceptions to improve the model.
curl -X PUT 'https://<my_api_endpoint>/api/v1/datasets/<my-project>/<my-dataset>/streams/<my-stream-name>/exceptions' \
    -H "Authorization: Bearer $REINFER_TOKEN" \
    -H "Content-Type: application/json" \
    -d '{
      "exceptions": [
        {
          "metadata": {
            "type": "Wrong Prediction"
          },
          "uid": "<comment-uid>"
        },
        {
          "metadata": {
            "type": "Wrong Prediction"
          },
          "uid": "<comment-uid>"
        }
      ]
    }'
Done!
Congratulations, you have completed the Re:infer automation tutorial. Of course, your own automation application may be different from what is covered here. Please contact support if you have questions.