Single Sign-On
If your organisation uses OpenID Connect Single Sign-On (OIDC SSO), it is possible to use this to log in to the Re:infer platform. It is also possible to automate permissions of your Re:infer users via groups provided by your SSO solution. This guide will explain the requirements for integrating your organisation's OpenID Provider with the Re:infer platform, and details the functionality available.
This document opens with an overview aimed at product managers and system architects who wish to understand the SSO integration which the Re:infer platform can offer.
The subsequent sections provide resources for systems integrators to prepare your OpenID Provider to share user information with the Re:infer platform.
Re:infer does not currently provide a way for clients to configure SSO access to the Re:infer platform directly. Once your OpenID provider has been set up, please contact support with the required configuration for the Re:infer platform to integrate with your OpenID Provider.
Overview
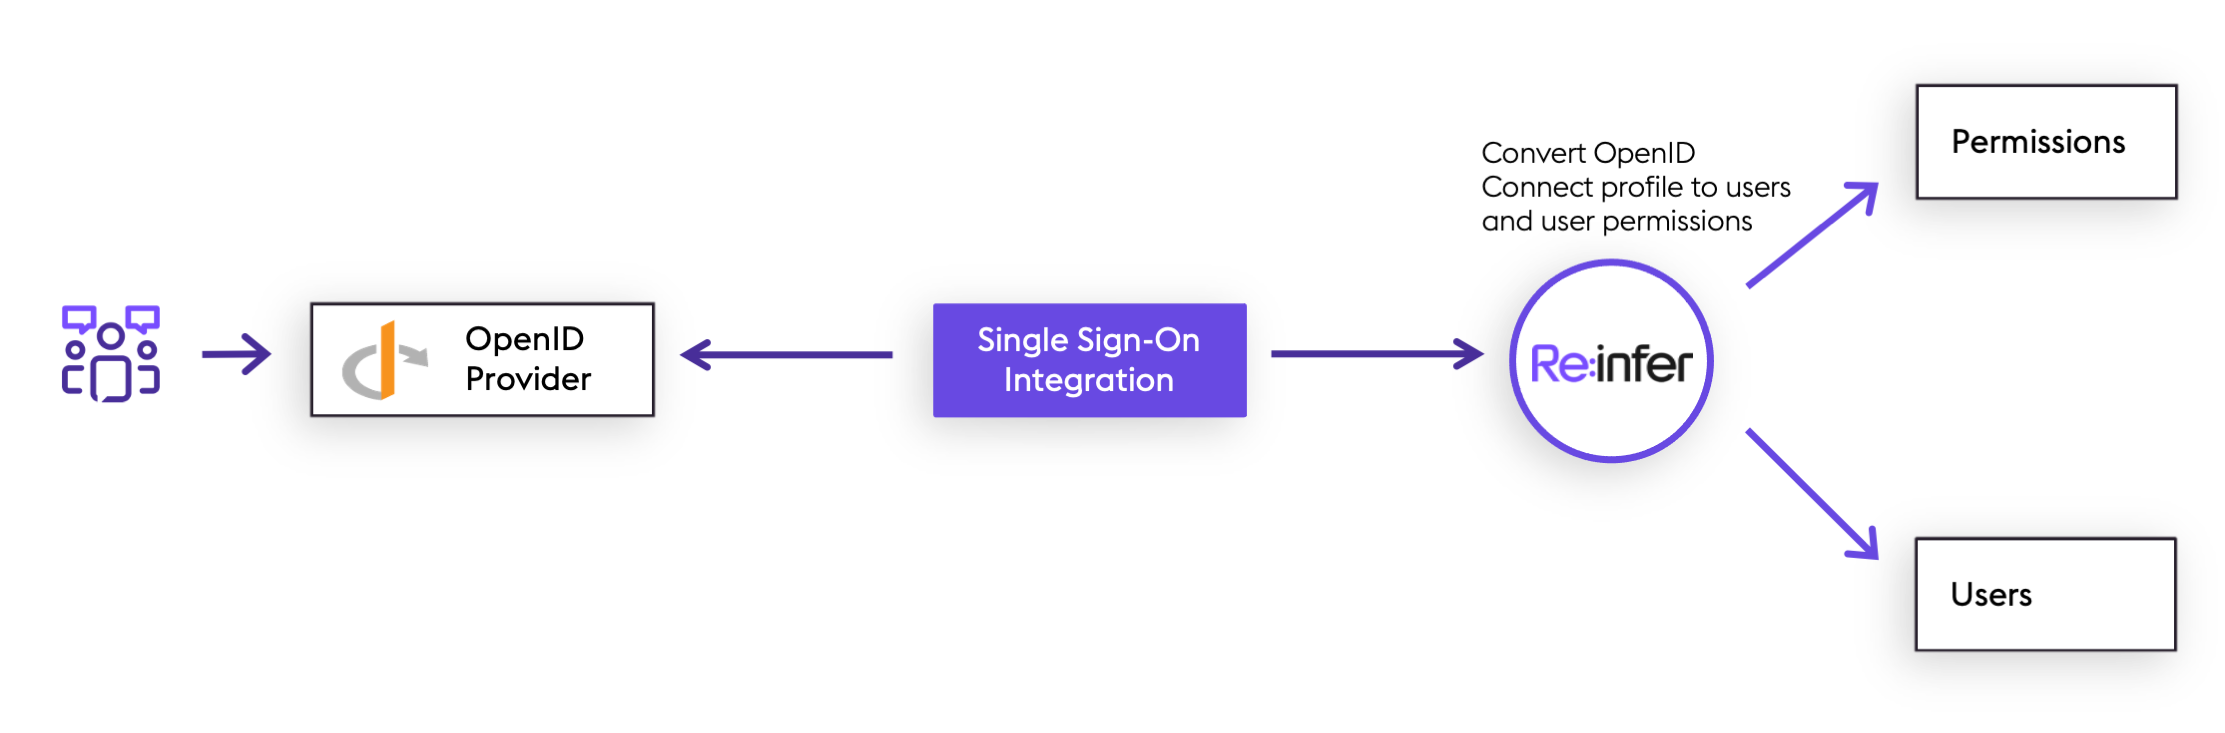
By default, Re:infer provides full capability to create and manage users within the Re:infer webapp. However, many organisations prefer to use "Single Sign-On" (SSO) technologies to centrally manage their user accounts and assign access to various SaaS products (such as Re:infer) which the organisation uses. Re:infer's supported SSO protocol is OpenID Connect (OIDC). OpenID Connect is a layer on top of the OAuth2 authorisation protocol which adds a standard way to transport a user profile from an OpenID Provider to services such as Re:infer dependent on the user's profile (these are known as "Relying Parties").
When OIDC SSO is enabled for your organisation, users are no longer managed within the Re:infer platform. Instead, when attempting to access the Re:infer platform, users will be first redirected to your organisation's OpenID Provider to authenticate with that system. The OpenID Provider then discloses sufficient information for Re:infer to create the user profile within the platform.
Re:infer then relies on OAuth2 refresh tokens to continue to synchronise the user profiles with changes made in the OpenID Provider, such as changes of name, email, or permissions. Eventually, a user profile's refresh token may expire. This can happen if the user is deleted in the OpenID Provider, or simply because the user has not accessed Re:infer in an extended period of time. Once a refresh token has expired, then the Re:infer platform will remove permissions from the corresponding user profile. This prevents users which have left your organisation from continuing to access data in Re:infer.
Synchronising Permissions
Re:infer provides a rich user permissions model for data access which can be managed via the Re:infer webapp.
Once integrated with your OpenID Provider, Re:infer is optionally able to derive permissions from user group membership shared by your OpenID Provider with the Re:infer platform. This allows you to automate the process of managing user permissions in Re:infer, if desirable.
There are two modes which Re:infer can use when synchronising user permissions in this way:
Strict mode: in this mode user permissions are specified exactly by the group membership from your OpenID Provider. After updating group membership, wait for sync (or log in/out the user to force immediate sync) to automatically update permissions of the user in the Re:infer platform.
Additive mode: same as strict mode, but existing permissions will not be removed from the user during sync. This means that additional permissions can be granted via the Re:infer webapp without them being wiped on a sync.
Using either of these modes, you should expect permissions to be synchronised from your OpenID Provider to Re:infer within 10 minutes.
The following table summarises the advantages and disadvantages of each of these two modes, and also of not using permissions sync:
| Permissions Sync Mode | Advantages | Disadvantages |
|---|---|---|
| Strict | • Fully automated • Easiest way to revoke access from users as their role in your organisation changes | • Permissions cannot be edited via the Re:infer webapp • Permissions for each group must be updated with Re:infer support |
| Additive | • Can grant permissions to users by both group membership and the Re:infer webapp | • Permissions are not removed from users when their group membership is revoked • Permissions granted by each group must be updated with Re:infer support |
| None | • User permissions are entirely managed on the Re:infer webapp | • No automation |
Configuring Single Sign-On
To configure Single Sign-On for the Re:infer platform, you will go through the following steps:
- Prepare your OpenID Provider to accept Single Sign-On from Re:infer
- Request your Re:infer platform tenant to be configured for Single Sign-On
- Test your Single Sign-On integration
The following sections discuss each of these in detail.
Preparing your OpenID Provider
To begin, you will need to create an OpenID "Client" for Re:infer in your OpenID provider. The way that this is done is different for each provider; refer to your OpenID Provider's documentation for exact details.
For example, below are guides for:
A few points to be aware of when configuring the client:
Re:infer uses the
client_secret_postclient authentication method, described in the OIDC specification. This means that the client you create in your OpenID provider must issue both aclient_idand aclient_secretwhich will be needed by Re:infer support for configuration.Re:infer will use the Authorization Code Flow to integrate with your OpenID provider. You must ensure the OAuth2
redirect_urlis configured in your OpenID provider tohttps://<mydomain>.reinfer.io/login/oauth2/callback(replace<mydomain>with your tenant domain).Re:infer will request the
openid,profile, andemailscopes from your OpenID Provider as part of the authorization flow. If necessary for your OpenID Provider, Re:infer can be configured to request additional scopes.
Re:infer expects all required claims to be present in the OIDC ID token as per the OIDC spec. Spec-compliant OpenID Providers are expected to be able to supply all of these as part of the scopes listed in the bullet above. Re:infer will also use other claims present in the token for ID token validation where applicable.
Additionally, Re:infer expects the following claims to be present in the OIDC ID token:
Claim Description preferred_usernameDisplay name for the user. emailEmail address of the user. Re:infer requires that your OpenID Provider issues a
refresh_tokenas part of the response from the OpenID token endpoint. This token is used to perform background synchronisation of the user profile between Re:infer and your OpenID provider. To maximise the duration for which Re:infer can synchronise the profile before requiring the user to log in again (see above), you may wish to configure your refresh token expiry to be a long duration (or unlimited). This may require Re:infer to request theoffline_accessscope from your OpenID Provider.If you wish to supply user permissions via your OpenID provider (see above) then your OpenID Provider must be configured to supply a list of user groups as a claim in either the ID token or Access Token.
Required configuration for Re:infer
The OpenID client credentials are sensitive material. We prefer to receive these via a more secure method than email. Our support team will help you arrange this transfer.
Once you have set up a client for Re:infer in your OpenID Provider, please contact support with the following information ready:
- OpenID
client_id - OpenID
client_secret. Please do not send this to us via email - we will arrange a secure way to receive this from you. - The HTTPS endpoint (aka
issuer) of your OpenID Provider. - If you wish to synchronise permissions:
- The location (in the ID Token or Access Token) of the claim which will
contain the list of user groups. (This is entirely subject to your OpenID
Provider configuration, for example it could be
id_token / roles,access_token / resource_access / reinfer.io, or any other such path.) If the scope containing this claim is not part of the default scopes, please provide the name of the scope so it can be requested in addition to default scopes (which are always requested). - Whether you want to use strict or additive permission sync.
- The groups which your users can be in, and how you would like these to map to Re:infer permissions. We can help you design this mapping.
- The location (in the ID Token or Access Token) of the claim which will
contain the list of user groups. (This is entirely subject to your OpenID
Provider configuration, for example it could be
Once we have received your email, we will work to set up the SSO configuration for your organisation as agreed.
Testing your Single Sign-On configuration
When we receive the desired configuration from you we will work to ensure that everything appears to be set up correctly from Re:infer's viewpoint. We won't have ability to log in via your Single Sign-On, so will need to work with you to verify the set-up.
Below are some of the things we'll test with you:
- When navigating to your organisation's Re:infer tenant domain (e.g.
https://example.reinfer.io), you should be redirected to your OpenID Provider to log in. - After logging in with your OpenID provider, you should be redirected back to Re:infer.
- You should check the user profile is synchronised as you expect on the Manage Account page.
- If synchronising permissions, you should test for various users that they have the expected permissions. (For each user, you can see their permissions on their Manage Account page after logging in as that user.)
FAQ and Troubleshooting
This section of the guide suggests what might be wrong in a misconfigured Single Sign-On setup, and what information we may need to resolve the issue. Please jump ahead to the topic(s) which are relevant to you.
Re:infer does not redirect to my OpenID Provider
If your organisation has Single Sign-On configured for Re:infer, navigating to
https://<mydomain>.reinfer.io should automatically redirect you to your
organisation's OpenID provider (replace <mydomain> with your
tenant domain).
If this does not occur, it means that the Re:infer authentication system was not able to initiate the sign-on process with your OpenID Provider. Please contact support to request assistance - we can use our service logs to identify misaligned configuration between the Re:infer platform and your OpenID Provider.
My OpenID Provider reports an error after Re:infer redirects to it
If Re:infer does redirect to your OpenID Provider successfully, but your OpenID Provider displays an error instead of a login screen, this again suggests misaligned configuration between the Re:infer platform and your OpenID Provider.
Consult again the above section on preparing your OpenID Provider. The members in your organisation responsible for configuring the OpenID Provider should be able to help diagnose the error and resolve any misconfiguration.
Re:infer reports an error after my OpenID Provider redirects back to Re:infer
If you are able to complete the sign-on with your OpenID Provider, it should redirect you back to the Re:infer platform, which then completes the sign-on process. If at this point you get an error message and sign-on does not complete, this suggests that your OpenID Provider is not supplying all the information which the Re:infer platform requires to complete sign-on.
Please contact support to request assistance - we can use our service logs to identify issues and work with you to resolve them.
Permissions are not syncing from my OpenID Provider to Re:infer
If the sign-on process works correctly, then it is expected that permission synchronisation will also work without issue. User profile and permission changes made in your OpenID Provider may take up to 10 minutes to sync to the Re:infer platform.
If you want to force a sync immediately, the user in question should log out from the Re:infer platform and then log in again.